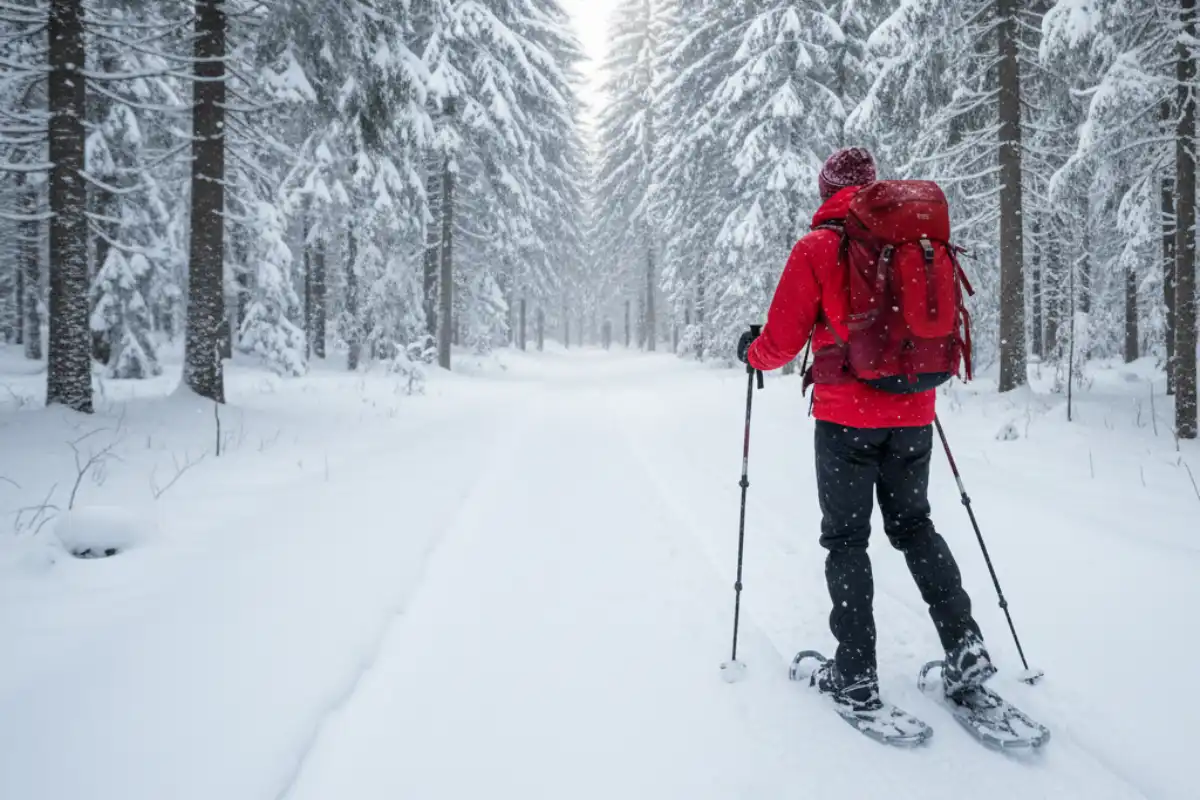
Snowshoeing for beginners: What to know
Snowshoeing is one of the most accessible and rewarding winter sports. If you can walk, you can snowshoe! It provides a fantastic, low-impact way to explore snowy wildernesses that would otherwise be impassable due to deep powder. For first-timers, a few simple guidelines on gear, technique, and safety can make the difference between an awkward stumble and an effortless glide across the snow.
The Essential Gear Checklist 🎒
While the equipment list is minimal, choosing the right items is crucial for comfort and safety.
1. Snowshoes and Poles
- **Rent Before You Buy:** Many experienced snowshoers recommend **renting a pair** first. This allows you to test different models and ensure you enjoy the activity before making a significant purchase.
- **Sizing:** Snowshoe size is determined by your **body weight PLUS the weight of your pack and gear**. Heavier loads or light, fluffy (powder) snow require a larger snowshoe surface area for better flotation. Beginners should opt for a versatile “rolling terrain” shoe.
- **Poles:** **Adjustable trekking poles with snow baskets** are highly recommended, especially for beginners. They significantly help with balance, provide stability on uneven terrain, and aid in pushing yourself up after a fall.
2. Footwear and Clothing (The Layering System)
The goal is to stay **warm, dry, and avoid overheating** (which leads to sweating and later, feeling dangerously cold).
- **Boots:** You need **warm, insulated, and waterproof winter boots** (or sturdy, waterproof hiking boots). The boot must fit snugly and securely in the snowshoe bindings. **Pro Tip:** Do not over-tighten the bindings, as this can restrict blood flow and make your feet colder!
- **Socks:** Choose **wool or synthetic** socks that wick away moisture. Always pack an **extra pair** switching to dry socks can revitalize cold feet and prevent blisters.
- **The Layering System:**
- **Base Layer (Wicking):** Merino wool or synthetic long underwear to pull sweat away from the skin.
- **Mid-Layer (Insulation):** Fleece jacket or a lightweight synthetic puffy coat to trap heat.
- **Outer Layer (Shell):** A **waterproof and breathable** jacket and pants to shield against wind and snow. Look for features like **pit zips** for quick ventilation.
Experienced Hiker’s Wisdom: Start Cold
“A common beginner mistake is starting with too many layers on. Snowshoeing is hard work you warm up fast! Start your hike feeling a little chilly. Once you start moving, you’ll warm up quickly without sweating excessively. If you stop for a break, put that extra insulating layer (puffy jacket) on immediately before you get cold.”
Mastering the Basic Snowshoeing Technique 🚶
Walking in snowshoes is intuitive, but a few minor adjustments improve efficiency and prevent trips.
1. The Flat and Rolling Terrain Walk
- **Wider Stance:** The most important adjustment is adopting a slightly **wider gait** than normal to prevent the frames of the snowshoes from hitting each other. Think of walking like a duck or riding a horse.
- **Walk Naturally:** The snowshoe’s binding pivots, allowing the tail to drag. Lift your foot slightly as you normally would. Your movement should remain relatively natural and relaxed.
- **Following Tracks:** If available, follow in the footsteps of the person ahead (a technique called “breaking trail”). The first person does the hard work of compacting the snow; everyone else conserves energy by stepping into the already-packed prints.
2. Uphill (Ascending) Technique
Snowshoes have metal crampons (teeth) on the bottom, especially under the ball of the foot (the toe crampon), for traction.
- **Kick-Step:** On gentle slopes, simply lift your knee and **kick the toe of the snowshoe into the snow** to create a secure step before transferring your weight.
- **Climbing Aids (Televators):** Many modern snowshoes have a heel lift bar (a small metal bar that flips up under your heel). This is a game-changer on steep climbs, as it reduces calf strain and makes the climb feel flatter.
- **Switchbacks/Traversing:** For very steep hills, walk in a zigzag pattern across the slope rather than straight up. This reduces the grade and is more energy efficient.
3. Downhill (Descending) Technique
- **Bend Knees and Lean Back:** Flex your knees and **lean slightly back** (stick your butt out a little). This keeps your weight centred over the powerful rear traction cleats of the snowshoe.
- **Heel First:** Plant your **heel first** to engage the heel crampon and control your slide. Use your poles planted in front of you for extra stability.
Snowshoeing Etiquette: Respecting the Trail
“Do not, under any circumstances, walk directly on set ski tracks! These grooves are specifically groomed for cross-country skiers. If you must use the same trail, walk single file along the very edge, opposite the ski tracks, to avoid ruining the surface for other users.”
Safety and Planning for First-Timers 🗺️
Preparation is key to a safe and enjoyable trip in the winter wilderness.
- **Start Small:** Begin with short, flat, or gently rolling, **marked trails**. Snowshoeing often burns more calories than regular hiking; plan for a shorter distance than you would normally walk.
- **The Ten Essentials:** Always carry the **Ten Essentials** in your pack: navigation (map/compass/GPS), sun protection, insulation (extra layers), illumination (headlamp), first-aid supplies, fire starter, repair kit/tools, nutrition (extra food), hydration (water), and emergency shelter.
- **Hydration:** The cold, dry air can dehydrate you quickly, even if you don’t feel thirsty. Drink water frequently. Insulate your water bottle to prevent freezing.
- **Go with a Guide:** For your very first outing, consider joining a guided tour or going with an experienced friend. They can teach you the basics and ensure a safe, enjoyable introduction.
Frequently Asked Questions About Snowshoeing
Do I need to be fit to go snowshoeing?
Not necessarily. Snowshoeing is essentially walking, making it highly accessible. If you can hike, you can snowshoe. You can choose to make it as easy or as strenuous as you like by selecting flat trails or tackling steeper mountain terrain. Beginners should start on easy, packed trails.
Can I use my regular hiking boots for snowshoeing?
You should use sturdy boots that are at least ankle-high. While waterproof summer hiking boots can work for short trips on packed snow, **insulated, waterproof winter boots** are far superior. They provide the necessary warmth and security required to lock into the snowshoe bindings and keep your feet dry in deeper snow.
How fast can I walk in snowshoes?
Expect your pace to be slower than summer hiking. On packed trails, you might cover 1.5 to 2 miles per hour (2.4 to 3.2 km/h). In deep, fresh powder (breaking trail), your pace can drop significantly, sometimes to less than 1 mile per hour, as it requires much more effort.
What is the “Leave No Trace” principle for snowshoeing?
The “Leave No Trace” principle means minimizing your impact on the environment. In the winter, this primarily means staying on the designated trails, packing out all trash (including food scraps), being respectful of wildlife, and avoiding walking on established cross-country ski tracks.
What is a good distance for a beginner’s first trip?
A good starting point is a loop or out-and-back trail of **1 to 1.5 miles (1.6 to 2.4 km)**, planning for about an hour of activity. This allows you to get comfortable with the gear and gauge your fitness without becoming overly fatigued or cold. You can always turn back early if needed or continue if you feel great!
Conclusion: Just Step Out!
Snowshoeing is truly a sport for everyone. It requires minimal specialized training and opens up the quiet beauty of the winter landscape. With the right gear prioritizing comfortable boots and proper layering and a simple understanding of walking technique, you’ll be gliding across the snow in no time. Start on easy trails, respect the mountain, and you’ll find snowshoeing to be a uniquely rewarding way to embrace the cold season.