How to Plan a Bikepacking Trip
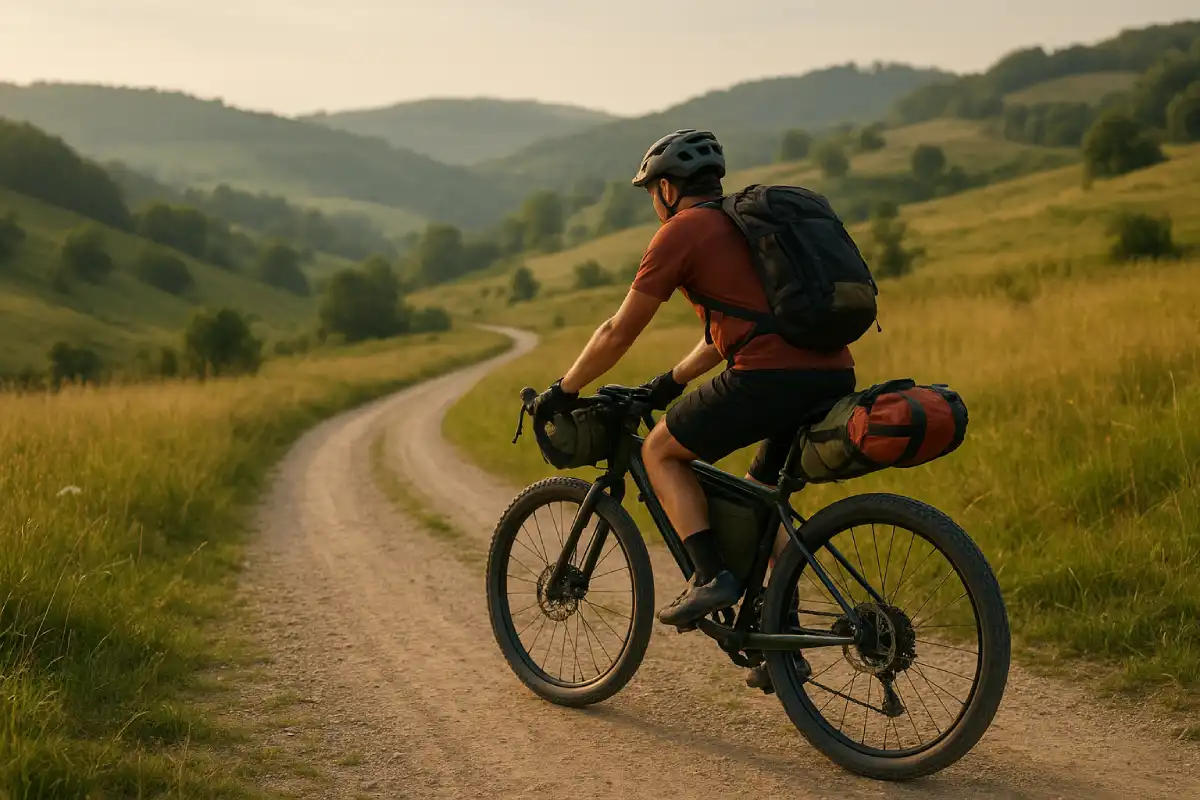
Bikepacking the fusion of backpacking and cycling offers the perfect blend of high-mileage adventure and self-supported wilderness travel. It’s the freedom of the open road combined with the thrill of minimalist living. However, preparing for your first trip, even a simple overnight, involves intricate planning around gear, logistics, and route selection. Unlike traditional touring with bulky panniers, bikepacking emphasizes lightweight, compact gear carried in specialized frame, saddle, and handlebar bags, demanding careful consideration of every item.
Route Planning and Logistics: Where to Go and How to Know 🗺️
A good bikepacking route is challenging but manageable, with reliable resupply points.
1. Starting Small and Local
For your first trip, choose an **overnight loop or a short out-and-back route** close to home. This allows you to bail easily if weather or gear issues arise. Look for:
- **Accessible Resupply:** Ensure there’s a town or store where you can refill water and buy food every 50-70 miles (80-110 km).
- **Familiar Terrain:** If you’re a mountain biker, choose gravel or singletrack. If you’re a road cyclist, opt for paved or well-maintained fire roads.
2. Essential Navigation Tools 🧭
Do not rely solely on your phone. Batteries die.
- **GPS Device or App:** Use platforms like **RideWithGPS or Komoot** to plan your route, and download the GPS files (GPX or TCX) onto a dedicated bike computer or phone app that works offline.
- **Paper Map Backup:** Always carry a printed map of your route and the immediate surrounding area. Knowing how to read a basic topographic map is a non-negotiable safety measure.
Bikepacking Forum Wisdom: Chris, from a Cycling Magazine Online Forum
“Newbies always try to plan for 100-mile days. For your first trip, cut your average daily mileage expectation by 30%. Remember, you are cycling with an extra 20–40 pounds of gear, and every incline will feel twice as hard. **Prioritize enjoying the ride and the camp setup over chasing huge numbers.**”
Gear and Bike Setup: Loading for Success ⚙️
The beauty of bikepacking lies in weight distribution. Avoid traditional bulky racks and focus on soft luggage attached directly to the frame.
1. The Three Primary Bags
Bikepacking bags distribute weight centrally and symmetrically, improving handling:
- **Frame Bag:** Fits inside the bike triangle. Ideal for dense, heavy items like water bladders, tools, and spare parts.
- **Saddle Bag (Seat Pack):** Sits behind the seat. Best for bulky, lightweight items like clothes and your sleeping bag.
- **Handlebar Roll:** Best for your sleep system (tent/tarp, sleeping bag, sleeping pad). This keeps them close and compact.
2. The Essential Repair Kit 🔧
Being self-sufficient is mandatory. Your repair kit is not optional.
- **Tire Repair:** Mini pump, tire levers, patch kit, and **at least two spare inner tubes**.
- **Tools:** Multi-tool with chain breaker, spare chain link, and zip ties (the ultimate repair tool).
- **First Aid:** A basic personal first aid kit for cuts, blisters, and pain relief.
Experienced Rider’s Advice: Elena, Long-Distance Touring Blog Contributor
“When packing, use the **’heavy-to-frame, light-to-ends’** rule. The heavier your gear, the closer it should be to the center of the bike (the frame bag). Keep light, bulky items (like sleeping bags) in the seat and handlebar packs. This prevents ‘wag’ and improves bike stability on rough terrain.”
Pre-Trip and Safety Check ✅
Before leaving, test your entire setup and ensure you have all safety backups in place.
1. The Shakedown Ride
A few days before your trip, perform a **’shakedown ride’**. Load your bike with all your planned gear and ride it for 10–20 miles. This reveals any clearance issues (bags hitting tires), instability problems (handlebar roll slipping), and allows you to confirm that your packed weight is manageable. Fix any issues discovered immediately.
2. Water and Food Strategy
Always know your water needs. Assume you need **at least 3–4 liters of water carrying capacity** per person in arid areas. Carry a reliable water filter or purification tablets. For food, plan simple, calorie-dense meals that require minimal cooking (e.g., dehydrated meals, instant oats, nut butter, and tortillas).
3. Communication and Weather
Inform a reliable person (your “emergency contact”) of your exact route, expected timeline, and check-in times. Check the weather forecast for your entire route not just the starting point and pack a waterproof outer layer even if the forecast is clear.
Frequently Asked Questions for Bikepacking Beginners
Do I need a specific ‘bikepacking’ bike to start?
No. You can start with almost any bike you already own a mountain bike, hybrid, or even a sturdy road bike. The key is **tire clearance** (the ability to fit wider tires, 35mm+) and **mounting points** for bottles and bags. Investing in a dedicated bike should only happen after you know you love the activity.
How do I manage the battery life of my GPS/phone on a multi-day trip?
Carry a high-capacity **power bank** (10,000–20,000 mAh is recommended). Turn off unnecessary apps and put your phone in airplane mode unless you need connectivity. Use a low-power GPS device for navigation and only use your phone for backup navigation, photos, and emergency communication.
Is it better to camp wild (stealth camping) or stay at organized campgrounds?
For your first trip, organized campgrounds or designated dispersed camping areas are safer and easier. They provide reliable water sources, bathrooms, and a known space to set up. Stealth camping requires more expertise in discretion and knowing local land laws.
What is the absolute minimum repair knowledge I need to have?
You absolutely must know how to **fix a flat tire (tube replacement)** and how to perform a **basic chain repair** (using a chain breaker and quick link). These are the two most common mechanical issues that will halt your trip. Watch YouTube tutorials and practice at home until you can do both quickly.
How do I choose the correct sleeping bag temperature rating?
Always assume the temperature will be colder than forecast. Choose a sleeping bag with a comfort rating that is **5–10°F lower** than the lowest expected nighttime temperature. If the forecast is 40°F (4°C), use a 30°F (-1°C) bag. This margin ensures warmth and safety.
Conclusion: Adventure Awaits, Two Wheels at a Time
Planning a bikepacking trip is an adventure in itself, but with methodical preparation, your first ride will be a rewarding success. Remember the core principles: **lightweight minimalism, distributed weight, and self-sufficiency.** Start with gear you already own, plan a manageable route, and focus on the joy of moving through the landscape under your own power. The learning curve is steep but incredibly rewarding. Once your gear is dialed in and your tires hit the gravel, you’ll discover the unmatched freedom that only bikepacking can offer.